

by Tom Harris
Most people who own a camcorder also own a stack of tapes with hours of shaky, jarring video footage.
o the typical amateur cameraman, this is an inevitable part of handheld video or film: When you move while you’re shooting, the camera seems to pick up your body’s every jolt and shake no matter how hard you try to keep it level.
But in professional movies and television shows you see lots of long, moving handheld shots that have no jolts and shakes at all. Cameramen achieve this remarkable effect using a device called a Steadicam®. Since their introduction in 1976, Steadicams have become one of the most important tools in the filmmaking world — they have expanded the cinematographer’s palette considerably.
In this article, we’ll find out what a Steadicam is and see how it can eliminate shaking and rolling. We’ll also look at the history of Steadicams and explore how they are used in movies.
Out of Balance
When a person walks or runs, each footstep sends a sizable jolt through the body. For the most part, you don’t register these shocks visually, because the brain automatically adjusts the information coming from the eyes; it smoothes out the disorienting motion when forming the visual image that the conscious mind is actually aware of.
Some cameras have a built-in adjustment mechanism to compensate for shaking motion, but these systems don’t come close to the natural stabilization system in the brain. The camera will still record a lot of the motion from the cameraman’s steps.
Even when a cameraman is standing still, the camera may pick up a lot of jarring motion. It’s so easy to pivot the camera that even a light push in any direction can translate to a considerable jump in the film or video image.
The jolts and shakes of handheld footage work well for certain scenes — an unsettling chase in a horror movie, for example, or a bare-bones documentary — but for the most part, filmmakers in the past shied away from handheld cinematography. When a scene called for the camera to move, the crew attached it to a dolly, a wheeled platform that rides on a track or smooth floor. Dollies work great for a wide range of shots, but they have certain limitations. You can’t use them on stairs, for example, and they are hard to navigate around obstacles. It is also extremely difficult to set them up on rough terrain.
In the early 1970s, a commercial director and producer named Garrett Brown began working on alternative stabilizing systems to get around these limitations. Brown wanted to build a highly portable device that would isolate the camera from the cameraman, as well as improve the camera’s balance, to minimize shakes and shocks.
In 1973, Brown realized his goals with a revolutionary but remarkably simple machine. “Brown’s Stabilizer,” later renamed Steadicam, stabilizes a camera using only three major elements:
1. An articulated, iso-elastic arm
2. A specialized “sled” that holds the camera equipment
3. A supportive vest
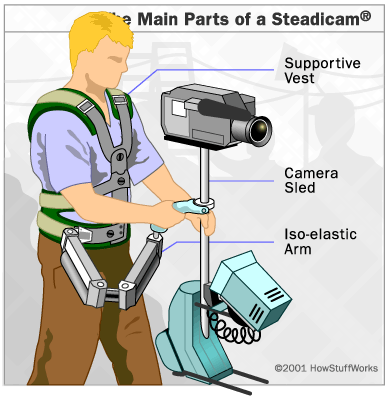
The basic elements of a Steadicam: the sled, arm and vest
In this diagram, you can see how these elements come together. The camera, along with a battery and a monitor, are positioned on the sled. The sled is attached to the articulated arm, which is attached to the vest. The arm and vest configuration works to isolate the camera from the body of the cameraman. The sled’s job is to provide optimum balance for the camera.
The Arm and the Vest
The Steadicam’s articulated arm is a lot like a spring-loaded swing-arm lamp. It consists of two arm segments, connected together with a pivoting hinge. Each arm segment is a sort of parallelogram: It is made up of two metal bars, fastened to two metal end blocks. Just as with any parallelogram, the metal bars will remain parallel with each other (or nearly parallel) no matter how the arm is positioned. Since the end blocks are secured to the ends of the parallel bars, they will remain in the same position as the arm swings up and down (as you can see in the diagram below).
If you were to attach a light to one of the end blocks in this design, as in a swing-arm desk lamp, the light would continue to shine in the same direction as you moved the arm up and down. In the same way, a camera attached to one of the end pieces keeps pointing in roughly the same direction. But in order to keep the camera sled absolutely level, the arm grips it with a free-moving gimbal. The sled’s own weight distribution keeps the camera balanced (as we’ll see later).
In this setup, the weight of the camera sled constantly pulls the arm downward — it works to bring the parallel metal bars together so that the front block (A and B) of each arm segment is lower than the rear block (C and D).
To counteract this downward force, the parallel metal bars in each arm are connected together with a spring system. The spring system works to close the parallelograms the opposite way — so that the front blocks are higher than the rear blocks. The system is precisely calibrated to exactly match the downward force of the sled’s weight. In this way, the arm and the camera sled will stay in the same position until the cameraman shifts the camera up and down.
In the original Steadicam design, the bars were connected directly with springs. In the modern Steadicam, the arrangement is a little more elaborate, but it serves the same function. You can see how this system works in the diagram below.

Each arm segment in a Steadicam consists of two metal bars, joined together by an adjustable spring system.
The lower bar in each arm segment is actually a hollow cylinder, with a large coiled spring inside. The spring is attached to a pulley, which is connected to a drum by a pair of metal cables. The drum, in turn, is connected by a cable to the opposite end block. In this configuration, the spring pulls the pulley back, which rotates the drum, which pulls the cable attached to the opposite end block. In this way, the strength of the coiled spring works to move the parallel metal bars opposite the force of the camera’s weight.
The advantage of this system is that it’s easy to adjust the spring strength to match different weight loads. The cable can be moved up and down on the end block. Moving it up rotates the drum, which pulls the pulley in closer, which stretches out the spring. This increases the pulling force working against the weight force.

The adjustable vest from the Steadicam Ultra series. Photo courtesy The Tiffen Company, LLC
The articulated arm essentially acts as a shock absorber for the camera sled. When the cameraman moves, the base of the arm moves as well. But the spring system in the rest of the arm responds to the weight of the sled. Instead of a sharp jolt, the camera shifts its position smoothly. The arm also frees up the cameraman’s hands — it hangs directly on the vest, so the cameraman doesn’t have to do anything to hold the camera sled up. He or she can concentrate on positioning the camera to get the best shot.
The Sled
The Steadicam sled is the assembly that actually holds the camera equipment. A Steadicam operator moves the camera by rotating and tilting the sled pole, the central piece of the sled, which connects the various camera components together. In the standard configuration, the monitor and battery are attached to the bottom of the sled pole, and the camera is attached to the top. Some Steadicams are reversible, so the cameraman can position the camera on the bottom and the other components on top. This makes it easier to get low angle shots.

The Steadicam sled spreads out the camera equipment to achieve greater balance.
In addition to moving with the pole, the camera can be pivoted up or down on its mount (called a sleigh), and in some Steadicams, the pole can telescope up and down. This lets the cameraman get high angle shots.
Other than holding the camera equipment, the sled’s primary job is to provide balance. It achieves this by increasing the camera system’s moment of inertia. An object’s moment of inertia is a measure of how resistant it is to rotation. This is determined by two factors: how much mass the object has and how far that mass is from the object’s axis of rotation. Increasing mass makes an object harder to rotate, as does increasing the distance between the mass and the axis of rotation (a rolled out slab of clay, for example, is harder to rotate than a tight clay ball with the same mass).
Increasing the object’s moment of inertia makes it harder to shake the camera unintentionally. One way to increase the moment of inertia would be to add more weight to the camera system, but this would make things harder for the cameraman. Instead, Garrett Brown decided to take the existing components of the camera and spread them out. This increases the distance between the axis of rotation and the mass of the total camera assembly, making the camera more resistant to rotation.

The sled from the Steadicam Ultra series. Photo courtesy The Tiffen Company, LLC
Expanding these components also shifts the camera assembly’s center of gravity. Simply put, an object’s center of gravity is the point where the object’s weight is balanced. When you hold an object precisely at its center of gravity, you can lift the object straight up because the downward pull of gravity is equal in all directions. You can balance a broom on your finger, for example, if you lift it at just the right spot between the bristles and the center of the broom stick. But if you place your finger anywhere else along the broomstick, gravity will pull more on one side than the other, and the broom will fall over.
In an ordinary camera assembly, the center of gravity is inside the camera itself. When you spread the components out, the center of gravity falls between the various pieces of equipment, along the sled pole. In a Steadicam, the articulated arm’s gimbal grips the sled pole just above the center of gravity, in order to keep the camera from tilting in any direction on its own. The cameraman typically grips the sled pole at a point near the center of gravity, allowing him or her to control the camera more precisely.
Balancing the sled components correctly is a precision operation. The camera, monitor and battery have to be positioned just right so that the center of gravity falls near the gimbal. To make this adjustment easier, sophisticated Steadicams are outfitted with radio-controlled motors that move the the various components by minute increments.
This makes it easier to balance the sled when the cameraman is getting ready for a shot, but it also allows the cameraman to make adjustments in the middle of a shot. This is an important feature, since the sled balance often changes during operation (for example, the weight of the film will shift as it moves through the camera). For some shots, the cameraman may want to shift the center of gravity away from the gimbal, so that the camera leans in one direction on its own. The balance can be adjusted with a joystick mounted on the sled grip, or remotely, with a radio-control unit.
The Steadicam Shot
Operating a Steadicam is one of the most difficult jobs on a movie set, but it is also one the most rewarding. For a typical Steadicam shot, a cameraman must follow a predetermined path, while simultaneously adjusting the camera and avoiding any obstacles, all the while supporting more than 60 pounds of camera equipment.

In addition to standard film models, the Tiffen Company makes Steadicams for video cameras. Here, operator Melanie Motiska demonstrates a Provid SK2 Steadicam. Photo courtesy The Tiffen Company, LLC
The job requires a good deal of physical stamina and technical skill, but it also calls for a good sense of shot composition. The director plans the shot, but the Steadicam operator makes it happen.
The best technique for Steadicam operation depends entirely on the nature of the shot. To film a simple conversation between two actors, an operator may try to replicate the even feel of a dolly shot, keeping the camera perfectly level and moving it slowly around the action. For a “flying sequence” over low ground, the operator might intentionally tilt the camera from side to side, creating a soaring effect.
One of the most common uses of the Steadicam is to track actors as they move around obstacles or rough ground. Typically, the operator will walk ahead of the actors, shooting them from the front as they walk and talk. For this sort of shot, the operator may walk backwards through the scene, with the help of other crew members. Or he or she may walk forward, with the camera pointing behind him or her. For these shots, and most any other shot, the director, the crew and the operator will all work together to figure out the best approach.
Most professional Steadicam operators work freelance, renting themselves as well as their equipment out as a complete package. When a scene in a film calls for a Steadicam shot, the filmmakers will select a Steadicam operator based on his or her past work. Most established Steadicam operators are members of the Steadicam Operators Association (SOA), founded in 1988 by Garrett Brown. In addition to representing hundreds of Steadicam operators, the SOA holds regular Steadicam training workshops. Tiffen, the company that manufactures Steadicams, also organizes training sessions.
Steadicam operators have helped create some of the most memorable shots in film history. In “Rocky” (1976), one of the first feature films to use Steadicams, operator Garrett Brown let the audience follow Sylvester Stallone as he ran up the steps of the Philadelphia Art Museum. This shot, one of the most memorable in the movie, would have been nearly impossible before the Steadicam. In “The Shining” (1980), director Stanley Kubrick used a Steadicam shot to zip down the hallways of a haunted hotel, and another to follow Jack Nicholson through a snowy hedge maze.
Martin Scorsese, Paul Thomas Anderson and many other directors have used extremely complex Steadicam sequences to establish mood and setting. In “Goodfellas” (1990), Scorsese used a Steadicam to bring the viewer into the bustling Copacabana restaurant. In a single five-minute shot, the audience follows Ray Liotta in the back door, through the kitchen and up to the bar, stopping to meet patrons all the way. It’s one of the most mesmerizing sequences in the movie.
Steadicams are also used in special effects sequences. For the speeder bike chase in “Return of the Jedi” (1983), operator Garrett Brown walked the camera very slowly through parts of California’s Redwood National Park. The special effects crew sped this footage up and combined it with blue-screen footage of the actors on bikes for one of the most exhilarating chase sequences ever filmed. Without a Steadicam, the footage would have been way too shaky when it was sped up.
Steadicams have given filmmakers and movie-goers alike a new freedom of movement. With a Steadicam, a director can float the camera (and, by extension, the audience) into a forest, through a crowd of people, or down into a cave. In TV shows like “ER,” Steadicam shots put the audience in the middle of the action, as if they were another character in the show. This simple machine has truly changed the world of filmmaking forever.
source: LINK


